WordPress is the most popular content management system and blogging platform due to its simplicity and versatility. It is a free open source software and enables many internet users to self-host and designs their own websites. So in this guide, we will illustrate to you how to install WordPress.
For any kind of WordPress help, likely to be containing the installation issue or any other fact, you can call us at Toll-Free No: +1 888 614 0555. We are always there for you. Further on – Let’s get flawed to the same…

Advantages and Key Features of WordPress
Although WordPress is in the high competition in the Website development market, it has a combination of features that make it stand out in the competition. WordPress features include-
- Quick installation and up-gradation.
- The simplicity of Operations.
- Inbuilt themes.
- Inbuilt comments.
- Extensions and plugins.
- Media Management.
- Flexibility
- SEO
What you’ll need before installing WordPress
- A good web hosting provider.
- Download WordPress (zip file).
- FTP access to your web server.
- You’ll need an FTP client. FileZilla and Cyberduck are some of the free FTP clients for both PC and Mac. Basically, it is a desktop application that enables you to copy and transfer files from your own computer to your web server.
- Text editor likes Notepad or TextEdit.
- And at last, you’ll need a web browser of choice. Chrome and Safari are the best as they support the latest HTML5 and CSS3 standards.
WordPress can be installed manually and automatically. Let’s discuss them one-by-one.
How to install WordPress manually?
With all your pre-requisites in place, you are ready to start with setting up a database and admin user.
Step 1: Create a new WordPress database and User
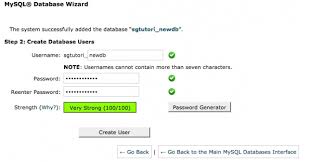
- Log into your hosting account. Access your account dashboard and try to find an option that enables you to create databases.
- Navigate to MySQL databases.
- Under the ‘Create new database section’ fill each field accordingly.
- Finally, you’ll have to set up privileges for your user account.
- You will need complete access as you are an administrator. To do this, go to ‘MySQL databases. Find your database at the top and then click the user you just created under the Users with Access column.
- Now you have to tick all of the boxes under the ‘What may users do to tables in these databases?’
- Save your changes. Your database is now ready to use.
Step 2: Configuration of WordPress’ wp-config.php File

- Navigate your downloaded WordPress Folder, and unzip it. You’ll find the wp-config-sample.php file inside. Open it and find the following code-
Replace the placeholders with relevant database information. - Make sure to put your credentials in single quotes. Leave DB_HOST as a localhost.
- Finally, save your changes.
- Rename the file itself to wp-config.php.
Step 3: Upload your WordPress files to your server.
- Return to the folder on your computer where you saved the WordPress software that you should already have downloaded.
- Connect to your web server using your FTP client, and upload all these files into the root directory of your hosting account.
Step 4: Run WordPress’ Installation Script.
- Navigate to your domain.com/wp-admin/install.php and replace the placeholder domain with that of your site.
- You will see a prompt asking you to choose a language for your WordPress installation. Before clicking Continue, select the language.
- On the next screen, you will be able to name your site and add a WordPress admin username, password, and email address.
- Finally, uncheck the checkbox ‘Allow search engines to index this site box’. This is because it stops your site from appearing in a search engine.
- When finished, click install WordPress.
Step 5: Test your installation.
After installation, you’ll be brought to the WordPress dashboard. Here you can test the settings, themes, plugins, etc.
How to install WordPress automatically?
Although WordPress is very easy to install, you can use auto-installers for installation as they are one-click installers. There are many popular installers- Quick Install, Softaculous, Fantastico, Installatron, CloudFront, etc. We will discuss the installation of WordPress using Quick Install.
Quick Install
The WordPress installation process could belong. WP Quick Install will take care of this. You just have to upload this tiny script where you want to install WordPress.
Features of Quick Install
- One-click install.
- Multilingual (multi-languages are available).
- Plugins and themes will automatically download and activated after you specify it.
- Auto Generate contents.
- Always up-to-date.
Steps to install
Step 1: Log in to your cPanel.
Step 2: Now in the Software section, click on the QuickInstall icon.
Step 3: On this page, click the One-Click Installs option.
Step 4: Select the WordPress 7 icon.
Step 5: Chose the domain that WordPress should be installed to as well as any subdirectory that you would like the site to load from (if desired).
Step 6: Complete the form with the corresponding information.
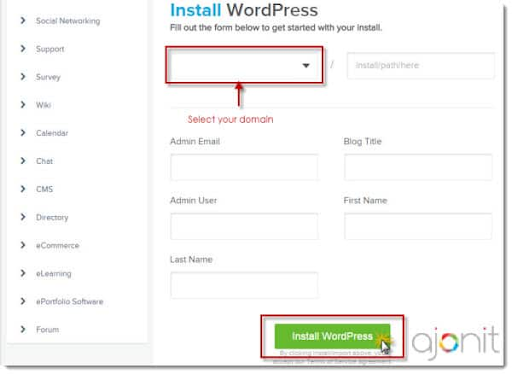
Step 7: When complete, click Details for your admin URL, username, and password.
After installation, you have all your credentials and you can start working on your WordPress site.
Common problems related to WordPress installation and their Solutions
-
- Error establishing a database connection
This means that the website is unable to connect to the database. The reason may be the misconfiguration in the wp-config.php file. To fix this problem, go to the root of this WordPress installation and check that you have provided the correct information in- Database name, Database Username, Database host, and Database password. - Connection timeout
When your website exceeds the server limit, you might see a connection timeout error. You can solve this issue by following ways-
– You’ll need to ask your hosting provider to increase your PHP memory limits.
– You may ask your hosting provider to increase the execution time in your php.ini file.
– Disable the current theme and go back to the WordPress original theme and check if the error is fixed or not. - Forbidden Access
This means your server doesn’t allow access to a specific page. To sort this issue, check if you are using plugins and whether they are blocked or not. You should also check your website for correct file permission by asking your hosting provider’s support.
- Error establishing a database connection
Why manual installation is better than automatic installation?
Manual installation is comparatively better because the automatic installation has the following issues-
- Easy to guess database patterns.
- Outdated scripts.
- Additional files installed inside your public root.
- Export/Import issues with WordPress built-in tools.
- Unwanted plugins and files.
- Default database table prefix.
- Issues with some plugins
Bottom Line
You must be confused between the automatic and manual installation of WordPress. If you are a beginner, the auto-installer is the best way to install WordPress. Or a better option is to choose a host that comes with WordPress pre-installed. But if you are keen to learn the installation manual for the pride, then go ahead and try. Understanding manual installation, WordPress gives you an advantage when it comes to building a successful site. You can also see exactly how your website interacts with the database, as well as how your files and their permissions work.
